How to Cut Acrylic Sheet With Less Risk of Cracking or Melting
Cut acrylic sheet on a table saw, or with a circular saw run along a clamped guide. Use a sharp carbide blade with a triple-chip grind, with fewer teeth as the sheet gets thicker, and feed at a steady pace. Cut curves with a router and a template, a band saw, or a CO2 laser.
Heat ruins more acrylic cuts than anything else. Most of the advice below is about keeping it down.
Acrylic and plexiglass are the same material, so everything here applies to both.
Why does acrylic melt, chip, or crack when you cut it?
Heat. Acrylic softens with friction. Every tooth that passes through the cut rubs the plastic as well as cutting it. More teeth mean more contact, and less time for the plastic to cool before the next tooth arrives. The cut gets hot, the plastic goes soft, and the kerf welds itself back together behind the blade. The melted plastic loads the teeth, and the blade then tears pieces out of the edge on its way out of the sheet.
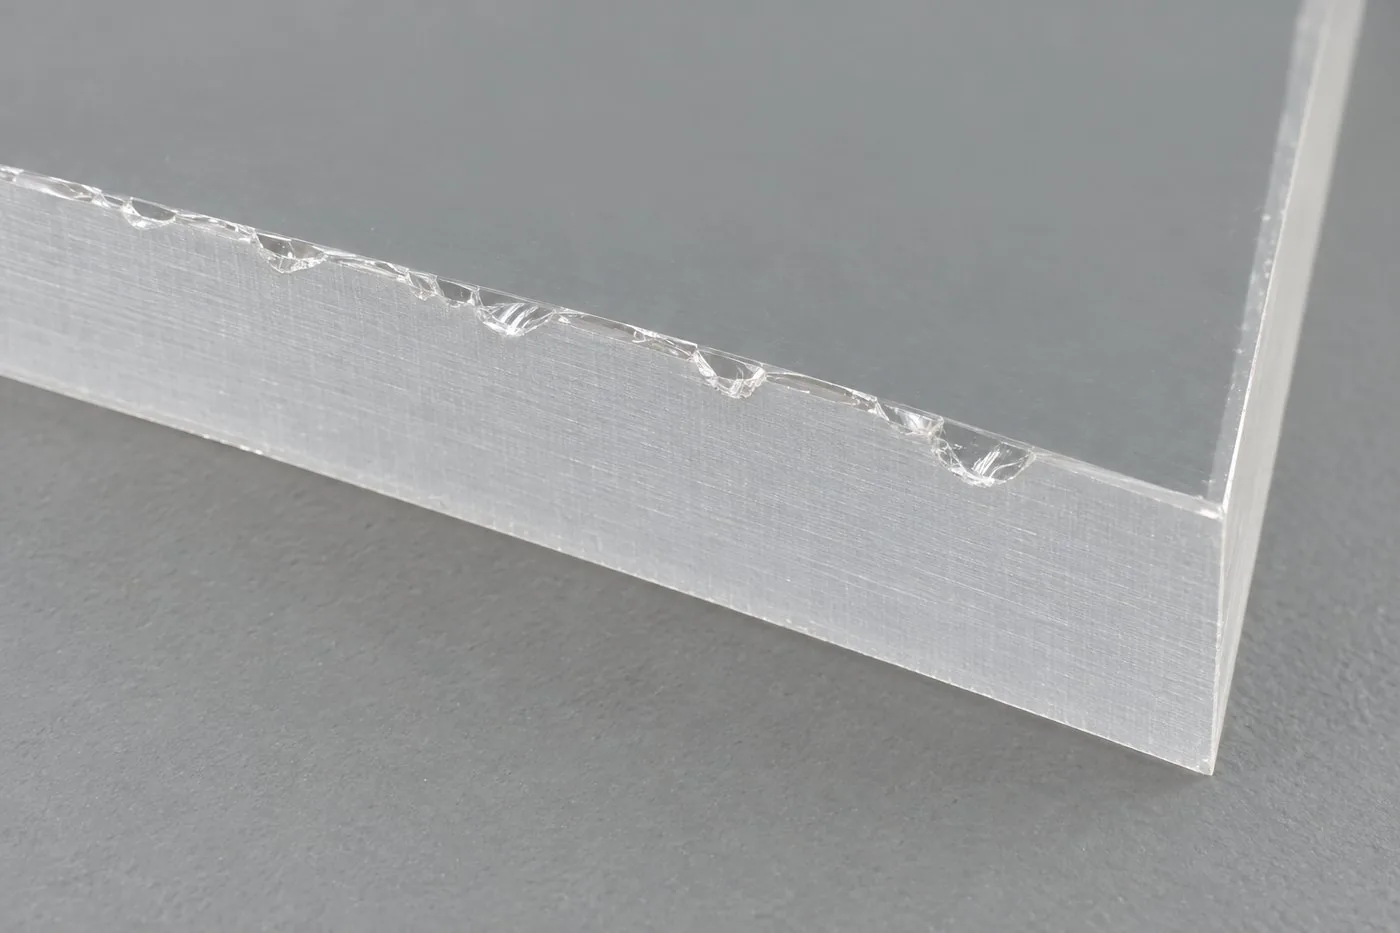
That is why melting and chipping are so often the same problem. A blade that runs cooler does less of both.
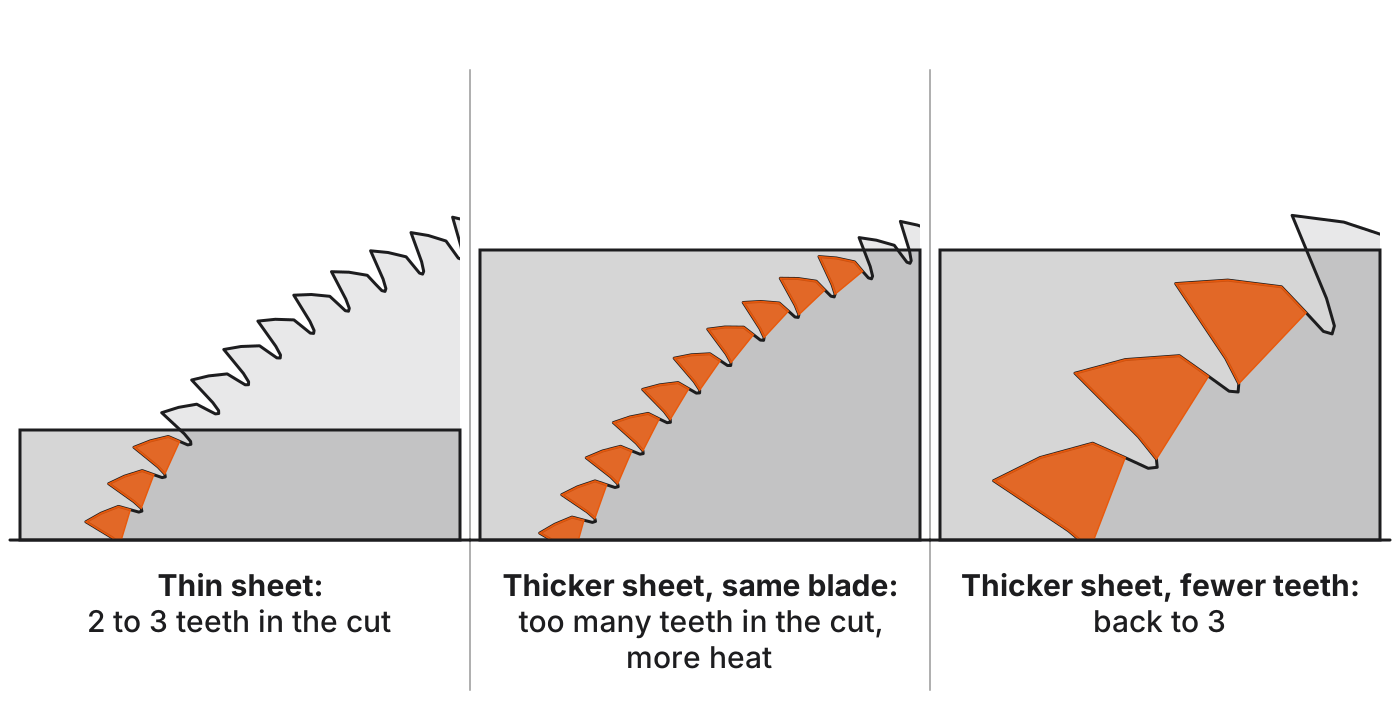
The number that matters is how many teeth are in the cut at one time. Sheet manufacturers put it at two to six, with three as the ideal: one tooth entering the sheet, one cutting, and one leaving. With more than that, the teeth rub and the cut heats up. With fewer than two, the blade grabs and chips. Thicker sheet puts more teeth in the cut, so thicker sheet needs a blade with fewer teeth.
Brittleness. Acrylic does not bend far before it breaks. A sheet that vibrates, hangs unsupported, or gets forced into the blade is the one most likely to crack.
So the job comes down to two things: keep the cut cool, and keep the sheet still.
What you need
- Eye protection, for every cut
- A table saw, or a circular saw with a straightedge guide and clamps
- A sharp carbide blade with a triple-chip grind, chosen for your saw and your sheet thickness (see the blade table below)
- A flat backer board or a sheet of rigid foam to cut on
- For curves: a router with a sharp carbide bit and a template, or a band saw
- A sharp scraper, wet-and-dry sandpaper, and a sanding block for the edge
- A dust mask for sanding, and a shop vacuum
Before any cut
- Leave the masking on. The film or paper on both faces protects the sheet from the saw table and the bench, and it takes a layout line. Peel it when the work is done.
- Support the whole sheet. Support both sides of the cut all the way to the end. An offcut that sags and drops is a common cause of a cracked corner.
- Clamp it, or hold it firmly against the fence. A sheet that shifts or chatters is more likely to chip and crack.
- Check the blade is sharp. A dull blade rubs, and rubbing is heat.
- Let a cold sheet warm up. Acrylic is more brittle cold. If the sheet came in from a cold garage or truck, give it time at room temperature first.
Which method suits which job?
| Method | Use it for | Watch for |
|---|---|---|
| Table saw | Straight cuts, any thickness | Blade choice and feed decide the edge |
| Circular saw on a guide | Straight cuts in pieces too big for a table saw | Needs full support under the sheet |
| Router and template | Curves, shapes, and finished edges | Take light passes; do not pause |
| Band saw | Curves and thick stock | Edge needs cleanup afterward |
| CO2 laser | Shapes and detail in thin sheet | Limited by your machine |
| Diode laser | Opaque colors in thin sheet only | Cannot cut clear or transparent acrylic |
| Scoring and snapping | Not recommended | Ragged or cracked edge |
| Jigsaw or rotary tool | Rough cuts only, if at all | Heat and vibration |
Which saw blade should you use for acrylic?
Start with the principle: heat is the enemy, and every tooth in the cut adds to it. The thicker the sheet, the fewer teeth you want on the blade.
Sheet manufacturers' fabrication guides agree on the type of blade and are specific about tooth count. Three of them (Polyvantis for Acrylite, Trinseo for Plexiglas, and Plaskolite) say the same things:
- Carbide-tipped teeth.
- A triple-chip grind, where every other tooth is beveled. The beveled tooth clears the middle of the cut, and the flat tooth behind it clears the sides.
- A low positive rake, between 0 and 10 degrees, so the teeth do not strike the sheet aggressively.
- Fewer teeth as the sheet gets thicker.
Blade diameter depends on the saw you have, so the tooth count does too.
| Your saw | Common blade | Sheet up to 1/2" | Sheet 1/2" to 1" | Where the figure comes from |
|---|---|---|---|---|
| Table saw | 10" | 80 teeth | 60 teeth | Polyvantis's Acrylite cutting brief. Trinseo's Plexiglas manual says 60 teeth on the largest blade the saw takes. |
| Table saw or miter saw | 12" | 80 to 100 teeth | 60 teeth | Polyvantis's Acrylite cutting brief |
| Miter saw | 10" | 80 teeth | 60 teeth | The same blade as a 10" table saw. The manufacturers do not address miter saws separately. |
| Circular saw | 7-1/4" | about 58 teeth | about 44 teeth | Our arithmetic: the same tooth spacing as the 10" figures. No manufacturer publishes a count for this size. |
| Track saw | 6-1/2" (165 mm) | about 52 teeth | about 39 teeth | Our arithmetic, on the same basis |
Three notes on the table.
The manufacturers' counts fall as the sheet gets thicker, for the reason given above: more sheet in the cut means more teeth in the cut. For sheet over 1", Polyvantis lists only 12" and 14" blades, with 60 teeth.
For the smaller saws, buy the nearest tooth count you can find at or below the figure. A blade a few teeth under runs cooler. A blade well over it rubs.
A miter saw only cuts as wide as its blade reaches. Clamp the piece flat, and back it with a board so the sheet is supported at the cut.
How do you cut acrylic with a table saw?
A table saw gives the straightest cut and handles any thickness.
Set the blade height for the sheet. Manufacturers' figures run from 1/8" above the sheet for thin material to 1/2" above for thick. A higher blade puts fewer teeth in the cut and runs cooler. A lower blade gives more control and less chipping on the bottom face. If the edge is melting, raise the blade a little. If the bottom face is chipping, lower it.
Feed at a steady pace. By hand, manufacturers put it at roughly 3 to 4 inches a second. A slow feed keeps the blade rubbing in one place and builds heat. A forced or uneven feed can chip the sheet.
Read the cut. Clean chips and a matte, even edge mean the cut is running cool. A glazed, shiny, or lumpy edge, a kerf that has closed up behind the blade, or plastic stuck to the teeth all mean heat. Feed a little faster, raise the blade, and check that it is sharp.
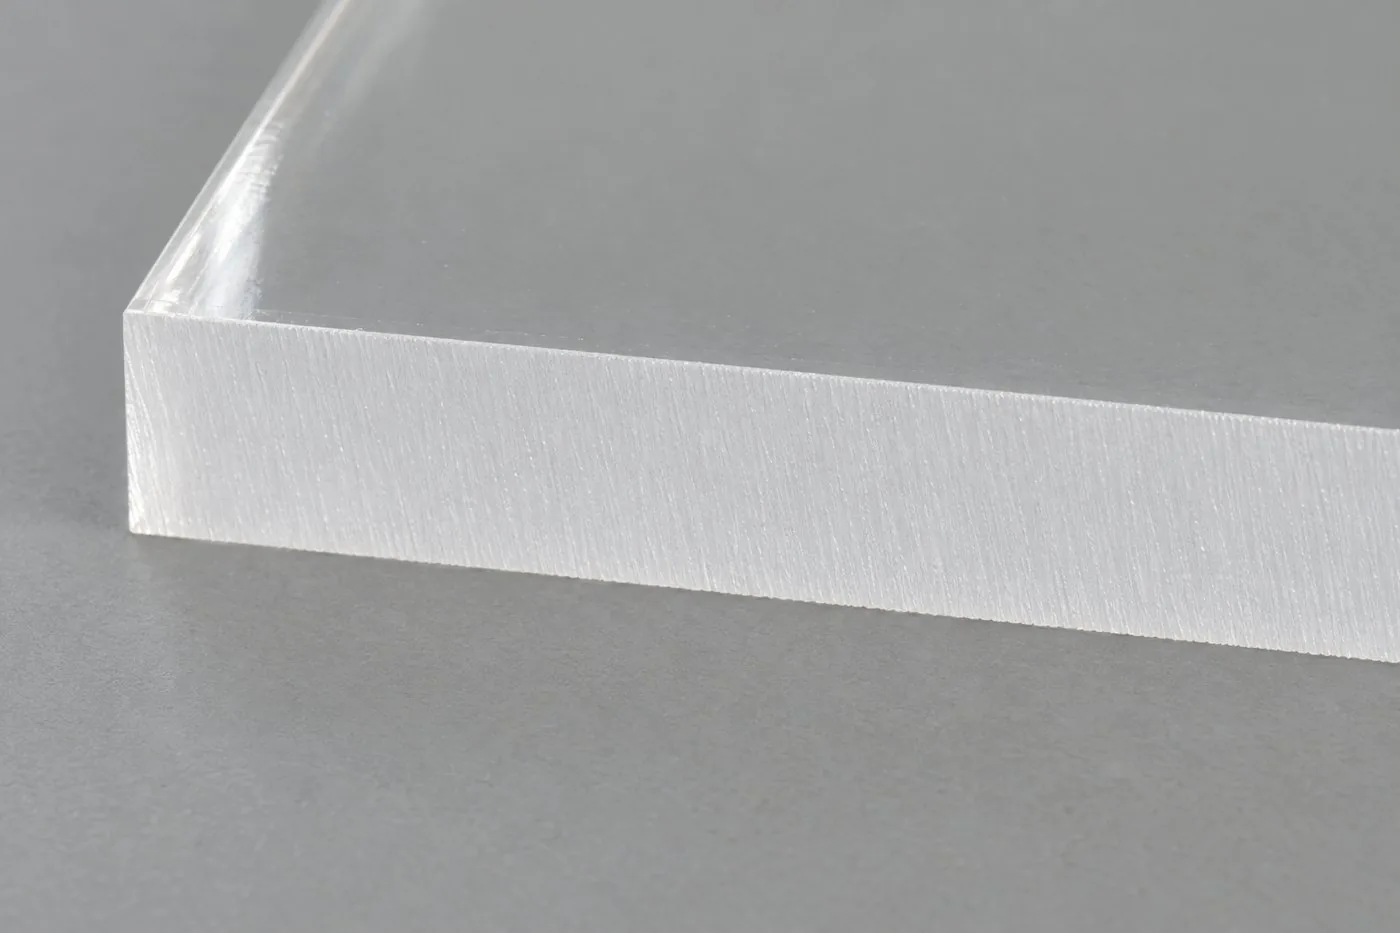
Do not stop in the cut. A spinning blade parked in the kerf melts the plastic around it. Push through in one pass.
Support thin sheet. Thin sheet can flex and chatter at the blade, which chips the bottom face. Use a zero-clearance insert so the sheet is supported right at the blade, or lay the sheet on a flat backer board and cut through both.
Keep the blade for acrylic. A blade that has been used on other materials dulls, and a dull blade melts the edge.
Let the blade reach full speed before the sheet touches it.
How do you cut acrylic with a circular saw or track saw?
Use a circular saw when the piece is too big to push across a table saw. A track saw is the same idea with the guide built in.
- Blade. Carbide, triple-chip grind, with the tooth count from the table above.
- Guide. Clamp a straightedge to the sheet and run the saw base along it. A cut that wanders binds the blade, and a bound blade heats and chips.
- Clamp the sheet down. Manufacturers allow a handheld circular saw for straight cuts on the condition that the sheet is clamped firmly, so it cannot vibrate.
- Support. Lay the sheet flat on a sacrificial sheet of rigid foam or a backer board, and set the blade to cut just into it. Both sides of the cut then stay supported to the very end.
- Feed. Steady, in one pass, without stopping.
How do you cut curves in acrylic?
Router and template
This is how a curve gets a finished edge.
- Rough-cut the shape a little outside the line first, so the router only has to trim.
- Fix a template to the sheet, and trim to the final shape with a flush-trim bit that follows it.
- Use a sharp carbide bit with one or two flutes. The saw rule applies here too: fewer cutting edges run cooler and clear chips better.
- Feed against the rotation of the bit, and keep moving. A router that pauses melts a dent into the edge.
- Take thick sheet in several shallow passes instead of one deep one.
Band saw
A band saw suits curves and thick stock. It runs cooler than most saws, because each tooth spends most of its trip out of the cut. The same rule holds: fewer teeth per inch as the sheet gets thicker. Manufacturers' figures are 10 or more teeth per inch for thin sheet, and skip-tooth blades with 2 to 6 teeth per inch for sheet over about 1/2". The edge comes off with tooth marks, so cut slightly outside the line and clean up to it.
What about a jigsaw or a rotary tool?
Neither is how a fabricator cuts acrylic, and both are easy to get a poor result from.
Sheet manufacturers describe the jigsaw the same way: a tool for rough-cutting tight curves and inside cuts in thin sheet. Their guides warn that its short stroke heats the blade quickly, so the cut plastic softens and fuses back to the edge. Their advice is a blade with 10 to 14 teeth per inch, the saw at full speed before it touches the sheet, a fast and steady feed, and a board clamped close to the cut line so the sheet cannot vibrate. In thin sheet, a finer blade keeps more than one tooth in the cut, which is what stops it grabbing. Cut outside the line, then bring the edge to the line with a router or by sanding.
A rotary tool (Dremel) spins a small bit very fast, which is a recipe for melting. Keep it for a small notch or a tight corner, on a low speed, and expect to clean up the edge.
Can you cut acrylic with a laser?
CO2 laser
A CO2 laser cuts acrylic and leaves a glossy edge. On most desktop machines, 1/8" cuts in a single pass, and 1/4" needs a slower pass.
- Leave the masking on to keep smoke residue off the face. If you are not sure how your sheet's masking behaves under the beam, cut a test piece from an offcut first.
- Raise the sheet on pins or a honeycomb bed, so the beam does not bounce back into the underside.
- Use air assist, and vent the machine outdoors or through a filter made for it. Cutting acrylic gives off sharp-smelling fumes.
- Never leave the laser running unattended. Acrylic burns, and a small flare can become a fire quickly.
For sheets sized to common machine beds, see the craft and laser sheets.
Diode laser
A diode laser cannot cut clear or transparent acrylic. Its blue beam passes straight through. That is a property of the light and the material, and no setting changes it.
A diode laser does cut opaque colors. 1/8" is the practical thickness, and it takes more passes than a CO2 machine. The full explanation is in CO2 vs diode lasers.
How do you cut mirror acrylic with less risk of chipping the mirror?
Mirror acrylic cuts with the same tools and the same blades. The difference is the back. The mirror is a reflective coating on the back of the sheet, under a painted backing. A chip or scratch in that backing shows in the reflection, so the back needs as much care as the front.
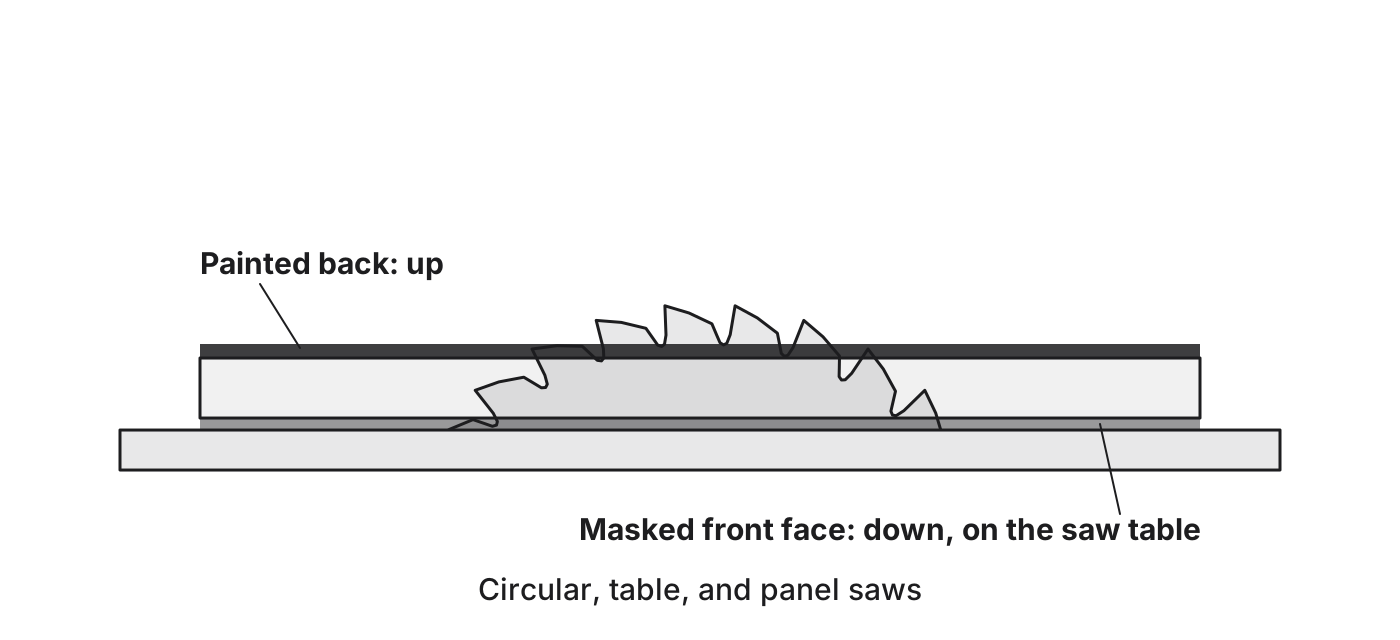
On a saw, put the masked front face down and the painted back up. That is the instruction in mirror sheet makers' fabrication guides, and they give it for circular saws, table saws, and panel saws alike. On a table saw or panel saw, the masked face rides on the table, protected by its masking, and nothing slides across the painted back. With a handheld circular saw, the saw's base rides on the painted back, so leave the paper interleaf on it if the sheet came with one, and check that the base is clean and smooth before you start.
The same guides add:
- Keep the masking on through cutting. If the sheets came with paper between them, leave it in place to protect the painted back.
- Handle and carry the sheet mirror side down, with the masking on. Do not slide sheets across each other or across a rough bench.
- Use a carbide triple-chip blade and a smooth, even feed. An uneven feed gums or chips the sheet.
- Clean the face with mild soap and a soft cloth. Use no chemicals at all on the painted back.
For a router, a band saw, or a jigsaw, the makers do not name a face. Keep the masking on, clamp a board close to the cut line, and support the sheet fully.
In a laser, mirror acrylic is a CO2-only material. Makers' guides say paper masking can go on one or both faces, and they say to cut a test piece first, because a laser leaves stress along the cut line. Never put mirror acrylic in a diode laser: the beam passes through the clear face and meets the reflective coating behind it.
How do you finish a cut edge?
A saw-cut edge is square and usable as it is. If it will be seen, work through these steps and stop when it suits the job.
- Scrape. Draw a sharp scraper along the edge to take off the saw marks.
- Sand wet. Wrap wet-and-dry paper around a block and work from a medium grit to a fine one, then a very fine one. Keep the block square to the edge so the corners stay crisp. This gives a smooth satin edge.
- Buff. For a clear edge, buff on a wheel with a plastic polishing compound, or by hand with a plastic polish. Use light pressure. A wheel that dwells heats the edge and smears it.
- Flame polish, with care. A torch passed quickly along a sanded acrylic edge melts the surface clear. It takes practice. Peel the masking back from the edge first, keep the flame moving, and try it on offcuts before a finished piece. Too much heat bubbles the edge and rounds the corners. Flame polishing is for acrylic only. If the look of the edge matters, this is the step most worth leaving to a shop.
Two cautions. Do not polish an edge you plan to glue: solvent cement bonds best to a square edge that is saw cut or sanded. And keep alcohol and solvents off a flame-polished edge. The heat leaves stress in the edge, and solvents can make it craze into fine cracks.
More on choosing an edge: acrylic edge finishes.
How do you reduce melting and chipping?
If the edge is melting, or the kerf is welding shut:
- Too many teeth are in the cut. Change to a blade with fewer teeth, or raise the blade a little.
- The blade is dull. Sharpen or replace it.
- The feed is too slow. Speed up until chips fly clear.
- You stopped in the cut. Push through in one pass.
If the edge is chipping, or the sheet is cracking:
- The cut is running hot. Melted plastic on the teeth tears the edge on the way out, so fix the heat first.
- The sheet is vibrating. Add support, and hold it down close to the blade.
- The bottom face is chipping on a table saw. Lower the blade a little, and close up the gap around it with a zero-clearance insert.
- You are forcing the feed. Ease off.
- The offcut is hanging. Support both sides to the end of the cut.
- The sheet is cold. Let it warm to room temperature.
Other mistakes worth avoiding:
- Peeling the masking before cutting
- Choosing a blade by how fine it looks, not by the sheet thickness
- Cutting right on the line with a rough tool, leaving nothing to clean up to
- Cleaning the finished piece with glass cleaner or solvent. See how to clean acrylic.
Or have it cut for you
We cut acrylic to the size you enter. Pick a color and thickness, type your dimensions, and the price shows as you type. Every piece is saw cut square, to approximately ±1/16" to ±1/8". A saw-cut edge is included, and you can choose a flame-polished or diamond-polished edge when you set your size. There is no minimum order.
That covers rectangles. For holes, notches, or curves, request a quote. We ship to the contiguous US. Pieces are cut to your dimensions, so check your measurements before you order. The details are on the returns page.
Shop acrylic cut to size · Mirror acrylic · How to buy acrylic cut to size
Related guides
- How to drill acrylic with less risk of cracking it
- How to cut polycarbonate sheet
- How to cut PVC sheet
- How to cut HDPE sheet
FAQ
What is the best way to cut acrylic sheet?
A table saw, or a circular saw run along a clamped guide, with a sharp carbide triple-chip blade matched to the sheet thickness. Feed steadily, support the whole sheet, and leave the masking on. For curves, use a router and template, a band saw, or a CO2 laser.
What saw blade is best for cutting acrylic?
A sharp carbide blade with a triple-chip grind. Sheet manufacturers recommend 80 teeth on a 10" blade for sheet up to 1/2" thick and 60 teeth for thicker sheet. The count falls as the sheet gets thicker because more teeth in the cut mean more contact, more heat, and a melted edge. The thicker the sheet, the fewer teeth you want.
Can you score and snap acrylic?
Sheet manufacturers' guides describe it for thin sheet, as a method for someone with no power tools. It is not how a fabricator cuts acrylic, and it risks a cracked sheet or a ragged edge. Use a saw as described above.
Why does acrylic melt when I cut it?
Friction heat. The usual causes are too many teeth in the cut, a dull blade, a feed that is too slow, or stopping partway through the cut. The melted plastic welds the cut closed behind the blade.
How do you reduce the risk of acrylic cracking when you cut it?
Keep the sheet fully supported on both sides of the cut and hold it still, keep the cut cool with the right blade and a steady feed, and let a cold sheet warm to room temperature first. Most cracks start with vibration, a hanging offcut, or a hot, chipping cut.
Can you cut acrylic with a jigsaw or a Dremel?
Only for rough work. Both build heat fast and are hard to control, so the edge is likely to melt or chip. If a jigsaw is all you have for a curve, cut outside the line and finish the edge with a router or by sanding.
Sources
Sheet manufacturers' published fabrication guides, used for the blade, feed, and mirror figures above.
- Polyvantis, ACRYLITE extruded sheet: Fabrication Information #2, Cutting with Circular Saws (2024). https://www.acrylite.co/files/content/acrylite.co/documents/fabrication-briefs/Extruded-Fabrication-Cutting-with-Circular-Saws-Technical-Information.pdf
- Trinseo, PLEXIGLAS Acrylic Sheet Fabrication Manual. Published by Trinseo (trinseo.com).
- Plaskolite, OPTIX-L Continuous Cast Acrylic Sheet Fabrication Guide (2024). https://plaskolite.com/docs/default-source/fab/fab007_opx_l_sheet.pdf
- Plaskolite, FABBACK Mirror Fabrication Guide (2023). https://plaskolite.com/docs/default-source/fab/fab011_fbk.pdf
- Mirrorworld, Acrylic Mirror Guide. https://mirrorworld.co.uk/pdf/Mirrorworld%20Acrylic%20Mirror%20Guide.pdf